|
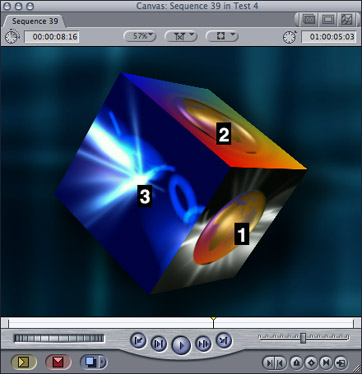
CGM DVE Vol.3+ contains a stunning filter for creating an animated 3D cube with videos playing on all six sides. In this workshop you'll learn how to make a transition from a full-size video to one playing on one side of the cube. Place the first scene onto track 2 of the timeline and make a cut at the point where the animation should start (1), then put the video which will fill the background behind the cube onto track 1. |
 |
||||||||||||||||||||||||||||||||||||||||||||||||||||||||||||
|
The outgoing video will be scaled down from full-size to one side of the cube. Place the playhead one second later than the cut on the timeline (2). The video's width must be cropped to fit the cube, otherwise the edges won't have the same length. You do this in the Crop section. Set keyframes for the Crop Border (3) and Width (4) sliders by selecting the respective keyframe buttons (x). The cube can be moved depth-wise into the picture by using the Move Depth slider in the Move 3D section. Set a keyframe for the Move Depth (5) slider. Now place the playhead at the beginning of the filter (1) and define the start value of these sliders to make the outgoing video full-screen. Set keyframes for Move Depth (6) & Crop Border (7) to zero, Width to 1 (8). You'll get nice smooth movement when you use the Bezier option for all keyframes. To do this, hold down the control key and click onto a keyframe point in the Viewer. A context menu appears where you select Smooth.
It's very important to use the Flicker Filter (9) when you are using standard interlaced video; for best results try the medium setting first. Now we have a cube where only the front side can be seen. We'll animate the x & y axis rotation by setting different keyframes for these sliders in the Rotate 3D section. Place the playhead a few frames after the zoom back ends (10) and select the keyframe buttons of the X axis Rotation (11) and Y axis Rotation (12) sliders. Their default value should be zero. Now place the playhead three seconds later in the timeline (13) and set a keyframe (14) for X axis Rotation to 145 degrees and a keyframe (15) for the Y axis Rotation at 215 degrees. Smooth these keyframes as previously described. Now the cube rotates and displays its other faces. To put different scenes onto the six sides of the cube, simply drop the desired video onto the respective Movie/Map wells.
|
 |
||||||||||||||||||||||||||||||||||||||||||||||||||||||||||||
|
That's it! |
 |
||||||||||||||||||||||||||||||||||||||||||||||||||||||||||||
|
 |