How to get a smooth text zoom effect - Movie

How to get a smooth text zoom effect - Movie
|
First place the background video onto the timeline and the video generator CGM Text (located in: Video Generators / CGM DVE Text) onto the track above. Open its settings, type in the text and adjust the fontsize. The width of the text line should fill the screen. |
 |
|
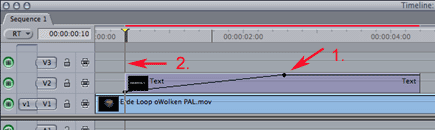
Now we want to fade in the text line. Therefore we set two keyframes for opacity. 1. Select the Pen Tool in the Tool Bench (or press key: p) and set the first keyframe as shown in the screenshot. You might have to first enable the Clip Overlays option in the timeline. 2. Then place the playhead at the first frame of your text and select the Motion tab (of the text) in the Viewer. Expand the opacity section and drag the Opacity slider to 0. The second keyframe for the opacity is automatically created, getting the result shown in the screenshot. |
 |
|
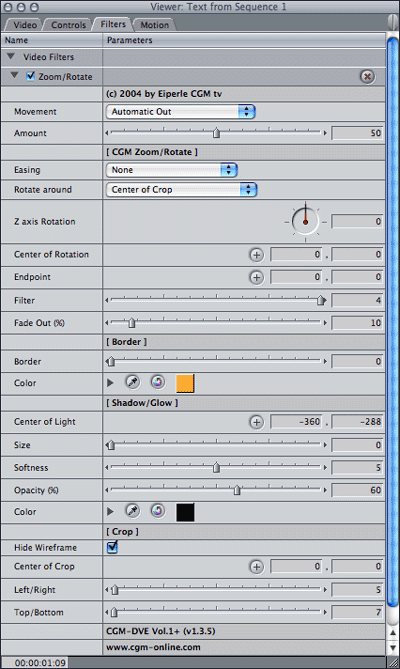
In this mode all settings will be automatically animated from 0 to their defined amount. You can control this however by modifying the Amount slider, for example to 50. This means the size of the image will be scaled from 100% to 50%. The Amount setting is used for all effect settings. When you define a 180 degree rotation and adjust the Amount to 50, the image will be rotated from 0 to 90 degrees. Optionally you can get an Ease In and/or Ease Out movement by selecting one of the Easing methods. |
 |
|
Apply the CGM Cross Dissolve (located in Video Transitions / CGM DVE Dissolve) to the end of the text to get a smooth fade out. |
 |
|
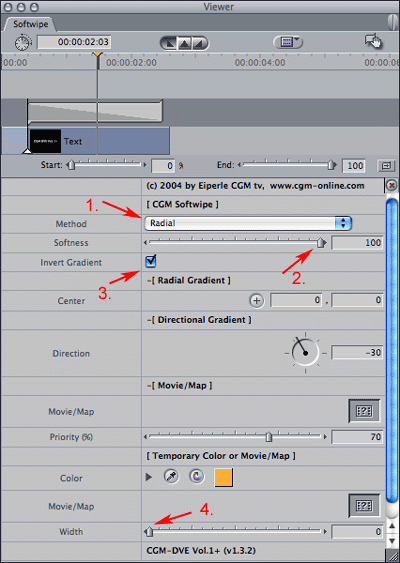
1. Select the Radial Method to use the built in radial dissolve pattern. 2. Adjust the Softness slider to 100. 3. Then select the Invert Gradient button to reverse the transition. 4. Last but not least adjust the Width to 0 in the Temporary Color or Movie/Map section in order to avoid unwanted colors during the fade effect. You'll save yourself a lof of work if you copy the first text arrangement as base for the second text line. Simply select the first text line in the timeline by dragging a selection rectangle over it, then hold down the alt key and drag the arrangement onto the 3rd track (don't forget to release the alt key before releasing the mouse button, otherwise you'll get an insert). Then simply double-click the generator and change its text. Ready! |
|