Zoom/Scale + Image Mask - Movie

Zoom/Scale + Image Mask - Movie

|
Here we want to key a video scene into a shape, such as the heart in our example, and have it fly from the corner to the middle of the screen. It's possible to achieve the basic effect in Final Cut Pro by defining keyframes for center, scale and rotate in the motion tab of the viewer and then smoothing the effect using the bezier controls to ease it out. Unfortunately, the result is rarely satisfactory because the three operations are not changing speed at the same rate. Instead, we'll use the CGM Zoom/Rotate 3D to get a quick, professional result. Place the video scene that will appear inside the heart shape onto V2 of the timeline, and the scene for the background onto V1. Add the CGM Zoom/Rotate 3D (located in Video Transitions / CGM DVE 3D) at the beginning of the foreground scene. |
 |
|
* You`ll find the picture Heart.tif in the Workshops folder on the CGM DVE CD. If you don`t have the CD, all the pictures used in the workshops can be found in the download area of our website (www.cgm-online.com), contained in a single file "Example Graphics (used in the workshops)". |
 |
|
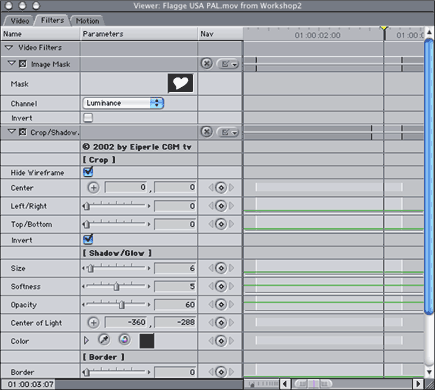
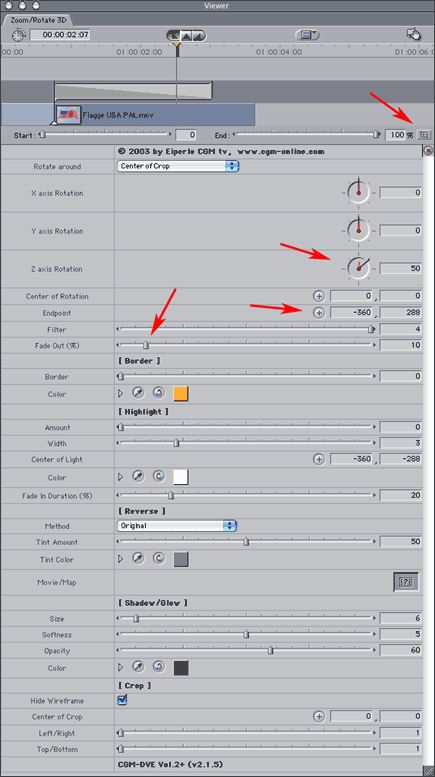
As we only want the heart to rotate around its z axis, set the x and y axis rotations both to zero. Set the z axis Rotation to 50 degrees so that it will rotate slightly. Set the Amount for Highlight to 0 and the Endpoint as the lower left corner. To have the heart fade in at the beginning, set the Fade Out slider to 20 percent. CGM DVE movements are all programmed to ease in and ease out automatically, so that the results are always even - the heart flies in smoothly. In our example we added a shadow while the Zoom/Rotate was running and another shadow of same size using the CGM Crop/Shadow/Border filter. |

|