| This workshop will explain how to change the speed of a scene using the CGM Speed filter (located in Video Filters / CGM DVE FX). We're going to increase the speed in the first half of the filter and bring it back to its original value in the second. Since FCP6 you can use Motion for speed changes. |
|
| Place the video on the timeline and use the Razor Blade tool (Shortcut Key: B) to add edits at the points where the speed should remain unchanged. The area between the edits (marked by a red circle) is where the speed is going to be altered and in this example it has a length of 22 frames (26 frames in NTSC). | 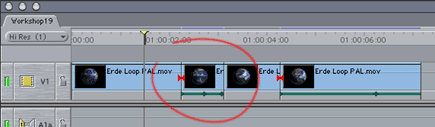 |
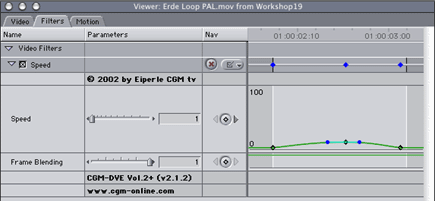
| Apply the CGM
Speed filter to the desired section. Set keyframes at the beginning
and end with a value of 1 for the original speed and another keyframe
in the middle set to 10 (10 times faster than the original). To make the
speed shift really smooth you can fine adjust the middle keyframe via
the context menu.
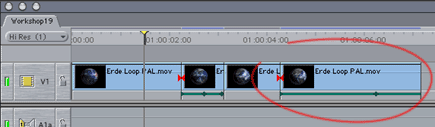
Render the scene. You'll need to trim the video following the section we've just altered to correct the time shift between them. So far, so good. |
|
|
Now we're going to decelerate the speed of the movie from here to the edit. Cut off the end of the video (in the red circle) and this time apply the CGM Speed (FF) filter. The FF stands for full frame. This version of the Speed is useful if you want to decelerate interlaced video. Take a look at a single frame and with normal (interlaced) video you'll see a fast flickering effect. This will also be evident when the speed is decreased. The FF version of the Speed includes a seamless adjustable Flicker Filter which reduces this flickering. |
|
|
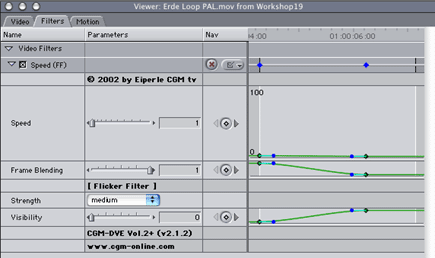
Make a keyframe at the beginning set to 1 and another near the end at 0. To get the best result, make a keyframe for the Frame Blending at the beginning set to 1 and another near the end at 0. If necessary Frame Blending is the function which calculates between two frames further blended frames. For example: If frame 11,25 is wanted, the calculated frame is 75% of frame 11 and 25% of frame 12. To reduce the flickering, simply define the Strength of the Flicker Filter. In the example we used medium. In cases where there is strong flickering use max. Then animate the visibility of the Flicker Filter by setting keyframes for the Visibility at the beginning set to 0 and another near the end at 100%. Render the scene and we're done. |
|