Scrolling Title
Scrolling Title
|
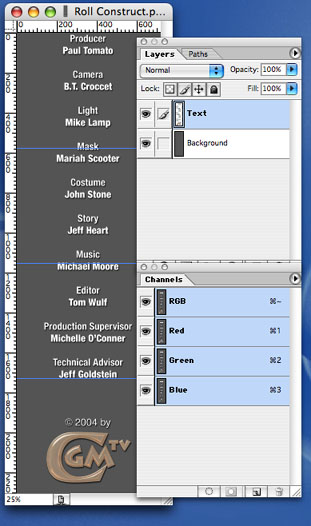
Open Roll Construct.psd template in Photoshop, and replace the example text with your own. * You`ll find the picture in the Workshops folder on the CGM DVE CD. If you don`t have the CD, all the pictures used in the workshops can be found in the download area of our website (www.cgm-online.com), contained in a single file "Example Graphics (used in the workshops)". Feel free to use layer effects like drop shadow, outer glow and so on. Fill out the background layer with grey. Then add a transparent layer, turn off the background layer and select the command layer / merge visible from the pull-down menu. Now the picture consists of the bitmap layer containing the text and the background layer. The next step is to scale the height of the image to get the correct aspect ratio of NTSC video. Change the height to 1920 pixels and leave the width at 720 pixels (you need to disable the 'Constrain Proportions' function). Important: Due to a FCP bug, the pixel height of the graphic must be a multiple of 4, otherwise the field rendering mode does not correspond to the timeline render settings. In the example 1920 / 4 = 480. |
 |
|
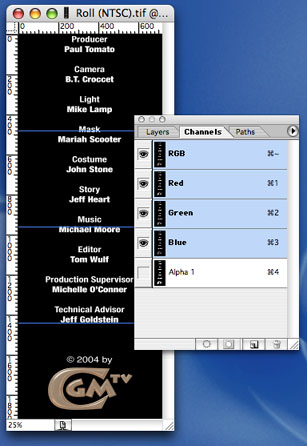
Its best to add an Alpha channel to the image if you are using a transparent background. Do a control+click onto the Text layer in the layers window and select from the context menu the command 'Duplicate Layer'. The new layer is automatically named 'Text copy'. Enable the 'Lock Transparent Pixels' mode.
Select the pencil tool and repaint all graphics by using the white color. Select the text layer and add a new layer (Pulldown menu Layer / New / Layer...). The new layer is automatically named 'Layer 1'. Fill out this layer with black. Switch off the layers 'Background' and 'Text' and from the pulldown menu select 'Layer / Merge Visible'. Press the keys Apple+a (shortcut for select all) and then Apple+c (for copy). Then select the channels tab and click on the 'Create new channel' button. Press the keys Apple+v (for paste) and you have sucessfully created an Alpha channel. Go back to the layers tab and delete 'Layer 1'. Switch on the text and background layers and select the background layer. Fill out this layer with the 'straight alpha color' (thats my name for this kind of effect color). In our example we have chosen black because the white text and the logo has a black outline and shadow. Then select the command 'layer / flatten image' from the pulldown menu. |
 |
|
Save the image as a TIFF file under a new name. Our example is named 'Roll (NTSC).tif'. Import the image into Final Cut and drag it onto V2 of your timeline. FCP4 and FCE2 users should switch to SaveRT. Switch the canvas preview size to 50%. |
|
|
Doubleclick the TIFF file in the timeline to open it's settings in the viewer and switch to the motion tab. There you can see that Final Cut automatically changes the scale and aspect ratio of oversized images. In order to ensure optimal render quality, it's recommended to use this exact pixel size as a default setting for all images in FCP. Click onto the basic motion reset button (1) and the scale setting goes back to 100%. Then click onto the distort reset button (2) and the aspect ratio will be 0. |
 |
|
Apply the CGM Roll-/Scroll Title video filter (located in Video Filters / CGM DVE 2D) and open its settings. Set the vertical start position of the title (18% in our example). Then modify the speed of the roll movement with the slider for movement y. In this example we’ve set a value of -4 pixels for the upper direction. Change the duration of the title track by trimming the end unil the text has rolled out completly. Ready! It's possible to alter the speed of movement by setting keyframes for the movement x and movement y. I decided to offer this improved video filter because so many people were reporting problems with “stuttering” roll titles with Boris or FCP. This error occurs when a title of a specified length and duration is rolling through the video. The frame by frame breakdown shows where the jerkiness comes from: 1. Frame: The title
moves 2 pixels. Our filter solves the problem by defining the movement frame by frame, ensuring consistency. The end result - smooth as silk... |
 |